Getting started
Introduction to LabBench
This protocol is a study on the correlation between depression, anxiety and stress assessed with the DASS scale, and response inhibition measured with the Stop-Signal Task. It is written to demonstrate the capabilities of LabBench to automate experimental protocols, providing guidance to operators and participants, and for automatic processing and export of experimental data.
Introduction
The purpose of this protocol is to demonstrate how an experimental protocol can be implemented with LabBench, which is demonstrated with a protocol that studies the relationship between Depression, Anxiety and Stress, and response inhibition is implemented. Depression, Anxiety and Stress is assessed with the DASS scale from the Psychology Foundation of Australia. The DASS scale measures three related emotional states of depression, anxiety, and stress on 42-item self-report questionnaire.
Response inhibition is assessed with the use of a gamified version of the Stop-Signal Task. The classical Stop-Signal Task measures the ability to supress actions that are no longer required or appropriate. In the Stop-Signal Task participants are asked to perform a Go task that at random and infrequent times are interrupted by a Stop-Signal. Without a Stop-Signal the subjects see a Go signal of a left or right arrow and must press the left or right button respectively. In these Go-trials, not pressing a button is an error and the goal is to press the correct right or left button as fast as possible. However, when a Stop-Signal is presented with a delay after the Go-Signal, the participant must inhibit their response, and in these trials pressing a button is an error. The delay between the Go and Stop signals is adjusted throughout the test to find the minimal delay at which the participants can inhibit their response.
In the classical Stop-Signal Task the participants are told whether they responded correctly or incorrectly after each trial. However, in the present protocol the Stop-Signal Task has been turned into a game to demonstrate the capabilities of LabBench for dynamically generating visual stimuli. In this version the participants are awarded points depending on how fast and how many times they answer correctly on Go signals. However, if they fail to inhibit their response in Stop trials the additional points, they are answered for multiple correct Go trials answers are reset.
This introduction will explain how to setup, run, and analyse data from this experiment. This explanation will provide an overview of all the key concepts that needs to be known before you can use LabBench for your studies within neuroscience.
Setting up the experiment
Before you can run an experiment with LabBench you must first have a protocol. For this introduction you will use a protocol that is available in the public LabBench Protocol Repository, and consequently, we do not need to write this protocol before running the experiment.
The LabBench Protocol Repository is a source of three types of protocols; 1) protocols like the present one that is intended to teach you how to use LabBench and how to write your own protocols, 2) template protocols that contains templates for experimental procedures that can be included into your own protocols and thus reducing the work involved in writing protocols, and 3) standard protocols that can be used in studies that are intended to ensure that studies are using the same protocol as an original reference study.
Once, like for the present introduction, a protocol is available in a protocol repository the first step in a study is to setup an experiment based on this protocol. This setup is performed with the LabBench Designer program.
LabBench consists of two programs:
- LabBench Designer is used for setting up and managing experiments.
- LabBench Runner is used for running experiments in the laboratory.
In short LabBench Runner is used in experimental sessions when a participant is present, and LabBench Designer is used at all other purposes.
Experimental Setup
LabBench is intended for experiments that takes place in a laboratory where equipment, such as rating scales, stimulators, visual displays are used to carry out experimental procedures. The set of equipment and their configuration for a study is referred to as the Experimental Setup of the study. For the present study we need an equipment setup that can be used for the subject to fill out the DASS questionnaire and to perform the Stop-Signal Task, and the protocol for the study defines two alternative experimental setups. The reason the protocol can define alternative experimental setups is that LabBench protocols does not rely on specific types of research equipment, instead they rely on abstract instruments that are implemented by research equipment in LabBench.
In the present protocol we need to perform two experimental procedures; filling out a questionnaire, and performing a cognitive task based on visual stimuli (Stop-Signal Task). These two experimental procedures need the following instruments:
| Procedure | Instruments | Purpose |
|---|---|---|
| DASS Questionnaire | Questionnaire | The Questionnaire instrument makes it possible to display series questions to the subject, such as Likert scales, multiple choice, Boolean questions, etc. For the DASS questionnaire in the present protocol only Likert questions are displayed to the subject. |
| Button | The Button instrument makes it possible for the subject to give their answer to the questions in the DASS questionnaire. For the DASS questionnaire four buttons is defined; 1) Increase the Likert rating, 2) Decrease the Likert rating, 3) Go to the next question, and 4) Go to the previous question. | |
| Stop-Signal Task | ImageDisplay | The ImageDisplay instrument makes it possible to display images to the subject. For the Stop-Signal Task it is used to display the visual stimuli in the Go and Stop Trials and to give feedback to subject on whether they answered correctly (WIN + Score) or incorrectly (LOSS + Score). |
| Button | The Button instrument makes it possible for the subject to respond to the Go trials or to provide an incorrect answer (a response) in the Stop trials. |
These instruments are provided by two alternative experimental setups; one based on the LabBench I/O device, and the other based on a standard USB joystick. This is possible as both a joystick and the LabBench I/O implements the Button instrument that is required for the protocol. In addition to either a joystick or an LabBench I/O both setups use a standard external monitor that implements the Questionnaire and ImageDisplay instruments.
Experimental setup: Joystick
The Joystick experimental setup is intended as a low-cost experimental setup that can be used for educational purposes, as it does not use specialized LabBench equipment. Instead, it relies on a standard USB joystick for PCs, which can be purchased for 25-35€. One joystick that has been used extensively is the Logitech F310 Gamepad.
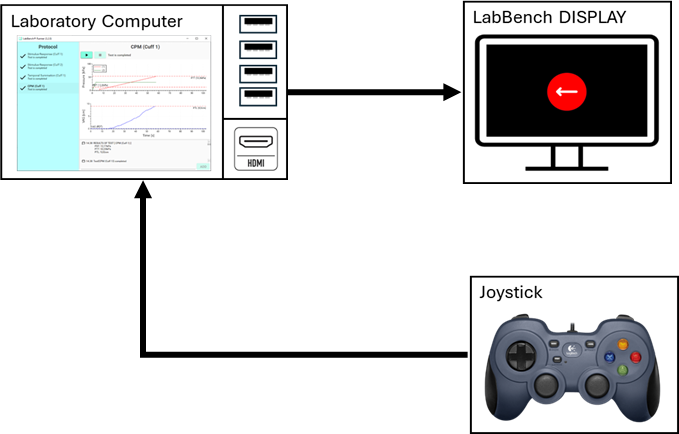
Figure 1: Overview of the joystick experimental setup.
An overview of the Joystick experimental setup can be seen in Figure 1. Caution must be observed when using this experimental setup as it is only intended for educational or evaluation purposes. The joystick does not provide means for synchronizing button presses with stimuli such as the visual stimuli in the Stop-Signal Task. Consequently, it has a low temporal precision and button presses can only be timestamped with a precision of 5-10ms. For neuroscience studies the LabBench I/O based setup is recommended.
Experimental Setup: LabBench I/O
The LabBench I/O setup shown in Figure 2 is the recommended experimental setup for cognitive tasks such as the Stop-Signal Task that are used in the present protocol.
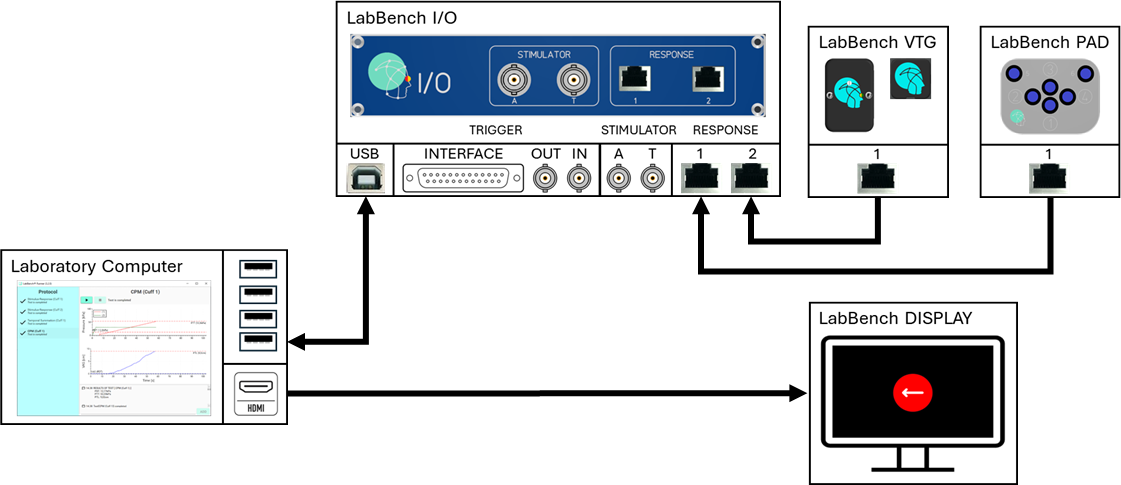
Figure 2: Overview of the LabBench I/O experimental setup.
The experimental setup consists of; 1) an LabBench PAD which implements the Button instrument, 2) a LabBench VTG which is used to timestamp button presses with respect to when the visual stimuli is shown on the display in the Stop-Signal Task, 3) An external monitor facing the subject that when configured for LabBench is termed a LabBench DISPLAY, and a LabBench I/O which is used to collect the responses from the subject. This setup has a high temporal resolution of < 1ms.
Adding required equipment to LabBench
Before an experiment can be created using one of its experimental setups the devices for this setup must first be added to LabBench. Please note this is done only once, if the devices have already been added for previous experiment this step can be skipped.
To add the equipment to LabBench; 1) start the LabBench Designer program, 2) Select the Devices page, 3) Select the type of equipment you want to add (LabBench Display and Joystick), 4) Click the “Scan and add” button (please see Figure 3).
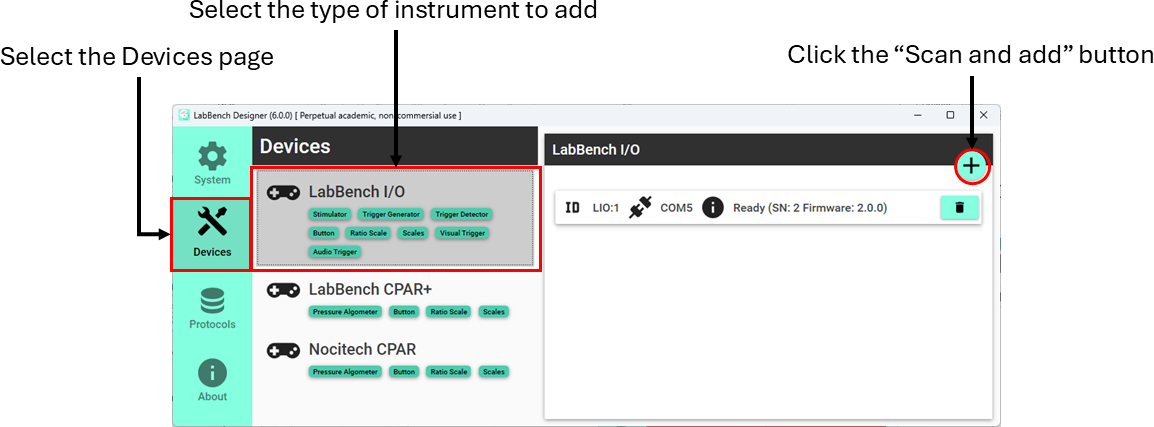
Figure 3:
Once the “Scan and add” button is pressed it will open a dialog window that allow you to scan for devices to add to the system (see Figure 4).
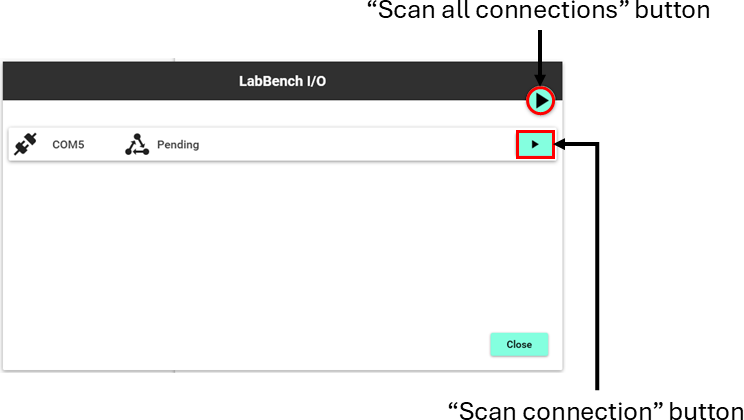
Figure 4:
Creating an experiment
To create an experiment, we must install a protocol from a repository. To view and install protocols from repositories first select the Protocols page in the LabBench Designer. This page allows you to configure repositories, view their protocols, and install protocols as experiments.
In this case we want to install the Introduction to LabBench protocol from the LabBench Protocol Repository. The LabBench Protocol Repository is an open and online protocol repository that is added automatically to LabBench when the program is installed. Consequently, for the installation of the Introduction to LabBench protocol we do not need to first add a protocol repository to LabBench to access this protocol. However, if you need to develop your own protocols, you must first create a repository in which you place your protocols and then add this repository to LabBench (please see [] for a guide on how to create and manage protocol repositories).
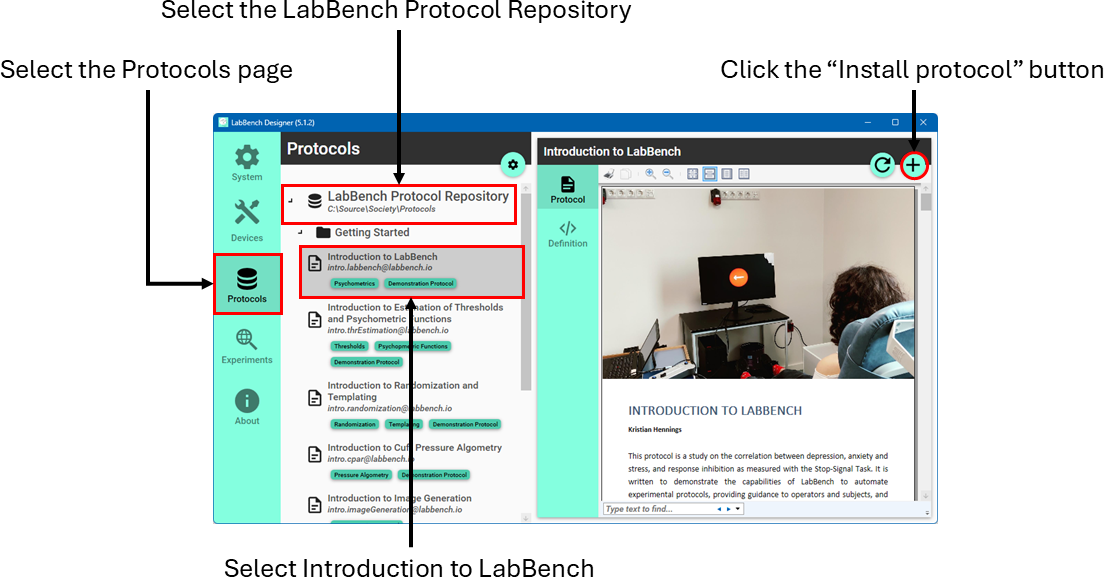
Figure 5:
To install the Introduction to LabBench protocols; 1) fold out the LabBench Protocol Repository, 2) fold out the Getting Started category in that repository, 3) in that category, select the Introduction to LabBench protocol, and 4) click the “Install Protocol” button (see Figure 5).
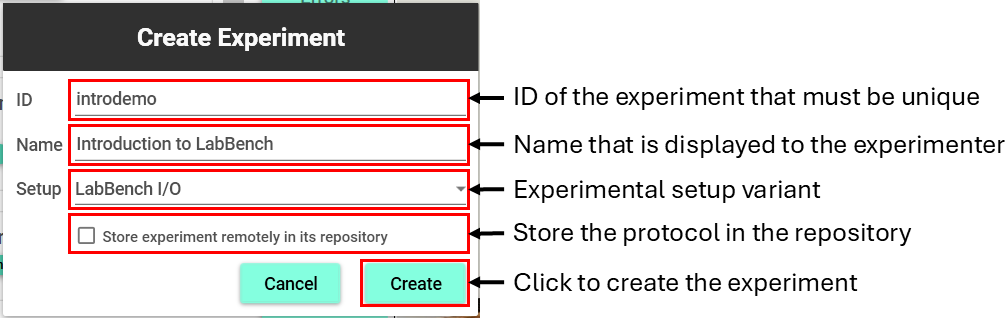
Figure 6:
Once the “Install Protocol” button is clicked it will open the Create Experiment dialog (see Figure 6). This dialog allows you to create an experiment from the protocol in the protocol repository. To create an experiment, you must give it a unique ID, a name, and choose which experimental setup to use in the experiment.
The ID must be unique. The reason for the uniqueness is that the ID is what LabBench use to store all protocol assets and data in its internal database, and thus it must be unique. If there is not an experiment with the same ID as the ID of the protocol in the repository, then the ID filled will be prefilled with the protocol ID. However, if there is already an experiment with that ID then you must provide a valid unique experiment ID.
The protocol name is what identifies the experiment to operators when they start the LabBench Runner to run an experimental session. You can use any description as the name for the experiment, however, it too must be unique as otherwise it would be confusing to the operators and will risk that they select the wrong experiment.
The “Store experiment remotely in the repository” allows you to configure whether the protocol is copied into the LabBench database on the current computer or whether the protocol and its assets are kept in its repository. If the protocol is stored remotely, it means that it will be loaded from the repository every time the experiment is accessed from the LabBench Designer or LabBench Runner. Storing the protocol remotely is an option that is intended ONLY as a convenience for the development protocols and should NEVER be used when running real experiments in the lab. Consequently, in this case make sure the “Store experiment remotely …” option is not checked when creating the experiment.
When you have provided an ID, Name, and chosen the experimental setup that match the devices you have available, then click the CREATE button. Once you click the CREATE button, the experiment will be created, and you will be taken to its Experiment page on the Experiments tab of the LabBench Designer.
Managing the experiment
Managing and export of data from experiments takes place on the Experiments tab of the LabBench Designer (see Figure 7). This tab consists of to the left a list of all the experiments that are currently installed on the computer and two the right the Experiment page for the currently selected experiment.
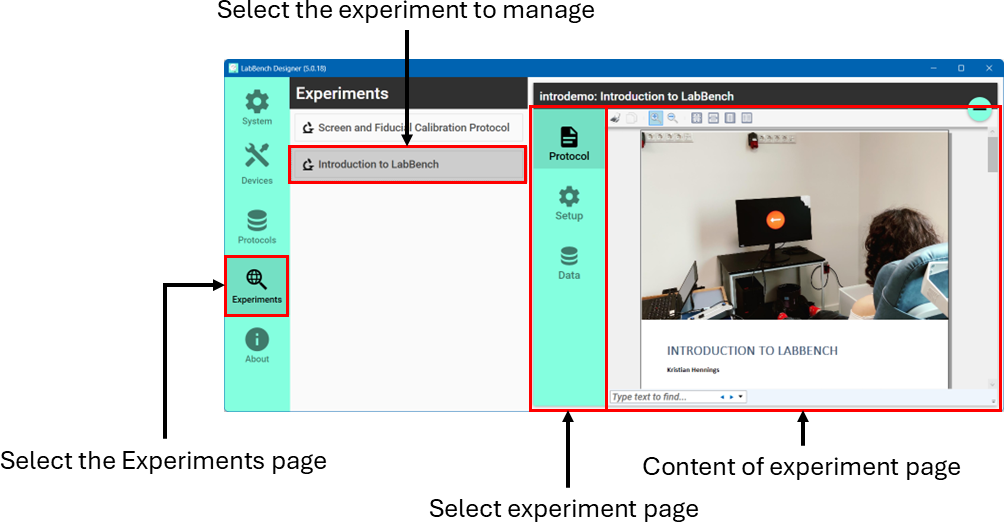
Figure 7:
The experiment page consists of up three tabs:
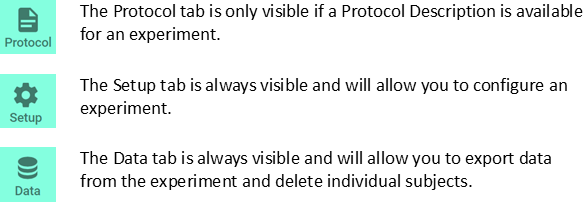
The experimental setup can be in the Setup tab and consists of a list of devices required by the experiment.
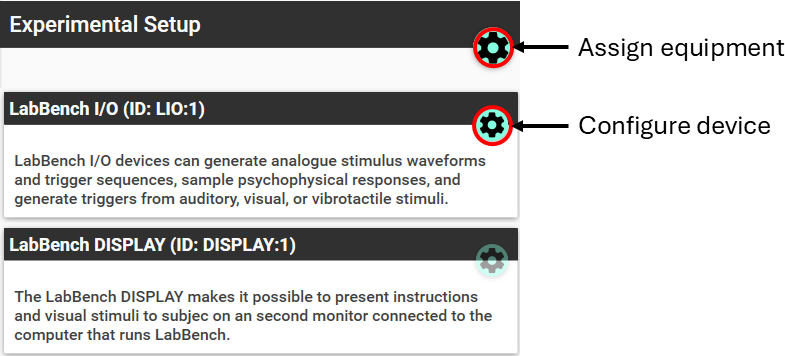
Figure 8:
The protocol refers to each device by a Protocol Device ID for the device to which a physical device ID must be assigned. The physical device ID is the ID given to each device that are added to the computer on the Devices tab of the LabBench Designer. When the experiment was created, a default physical device assignment was created. If you have more than one of the same types of devices this assignment may be incorrect and may need to be corrected.
Assignning equipment
To inspect and change the assignment of physical devices to Protocol Device IDs can be done by click the “Assign equipment” button. This will open the dialog shown in Figure 9.
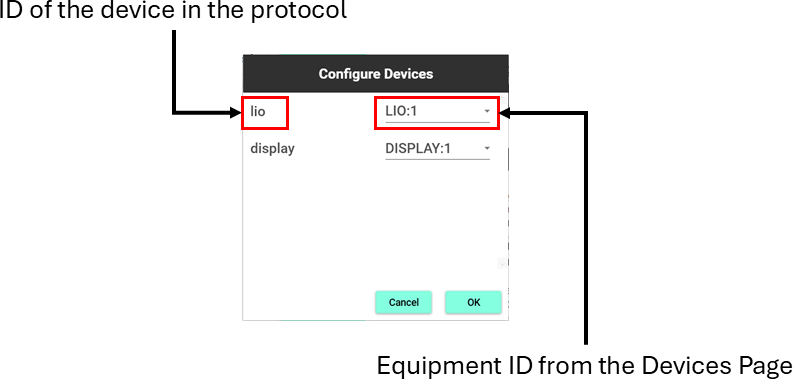
Figure 9:
The “Configure Devices” dialog consists of a list of Protocol Device IDs on the left, and to the right a drop-down for each Protocol Device ID that allow you to assign a Physical Device ID to each Protocol Device ID. Once the correct device assignments have been made you can save and close the dialog by clicking the OK button.
Configuring equipment
Most LabBench equipment is fully configured through the protocol and consequently does not need manual configuration by the experimenter. However, several generic 3rd party equipment does need to be manually configured.
Display calibration
In the present protocol, the external screen that is used to display the visual stimuli required for the Stop-Signal Task needs to be configured.
For the stimuli to be presented correctly the size of the screen, its distance to the subject, and the location and size of fiducials need to be configured. The size of the screen needs to be known to for the location and size of fiducials to be calculated correctly. Fiducials are white markers that are embedded in the visual stimuli and used to trigger a photosensor (LabBench VTG device) that will provide precise timing of subject responses.
The distance from the screen to the subject is not used in the present protocol. However, in protocols that requires elements that occupy a given visual angle for the subject it is used to calculate the size of these elements on the screen. Examples of such protocols are protocols that record psychophysical ratings with visual analog scales. The visual scale is usually required to be 10cm in length when viewed by a subject holding the scale in their hands. When the scale is displayed on an external screen at much larger distances, LabBench will automatically scale up the Visual Analog Scale, so it occupies the same visual angle for the subject as if they held the scale in their hands.
The display is globally for all experiments on the System => Display Calibration page (please see Figure 10).
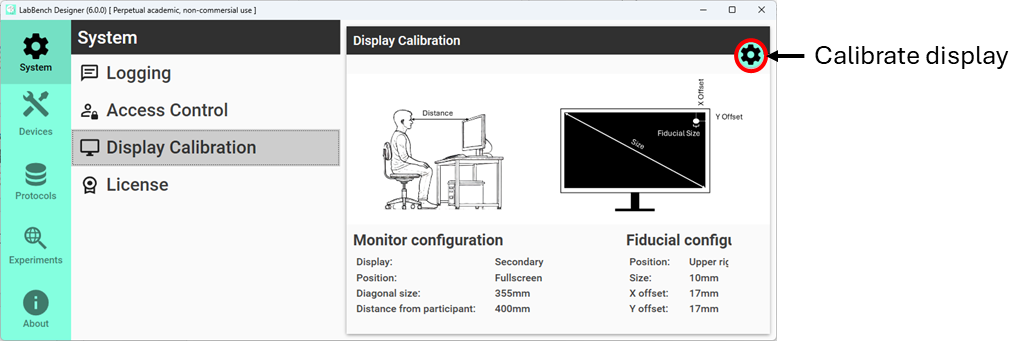
Figure 10
To configure the calibration for the display, click the “Calibrate display” button:
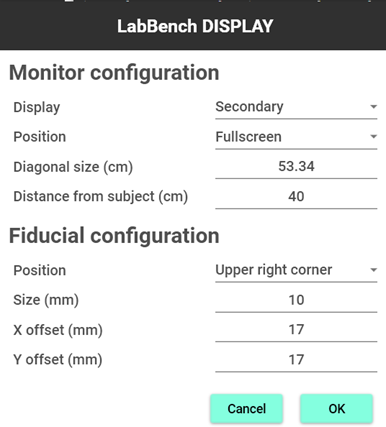
Figure 11:
Clicking this “Calibrate displau” button will open the configuration dialog for the device; the configuration dialog for the LabBench Display is shown in Figure 11. The values needed to be entered into this dialog can be determined with the Screen and Fiducial Calibration Protocol (calibration.screenFiducial@labbench.io) protocol that is available in the Calibration section of the LabBench Protocol Repository.
Post-session actions
Post-session actions are optional protocol elements and are actions that are performed at the end of a session when LabBench Runner is closed. If a post-session action fails at the end of a session, it can also be rerun from the LabBench Designer. Reasons for the failure of post-session actions could be the absence of an internet connection for actions that for example saves data to a network share or upload data to an FTP server.
Currently, LabBench supports the following types of post-session actions:
- Export Data Action: will export session data in either the json or MATLAB file format.
- Export to CSV File Action: will export session data as comma-separated values. This action will also enable export to CSV for all the experimental data. In this case, when all experimental data is exported to a CSV file each subject will be a row in the CSV file.
- Create PDF File Action: This will create a PDF file from the session data. The format and data content of this PDF file needs to be specified in the Experiment Definition File (*.expx).
- Copy File Action: will copy a file in the file system. This action is useful to copy previously created PDF and/or data files to for example a network share or similar.
- Run Script Action: will run a python script. This action can be used to create actions that are not natively supported by LabBench. An example of such an action could be the upload of data to an FTP server or another 3rd party data backend service.
The dialog for configuration and rerunning post-session actions are shown in Figure 12.
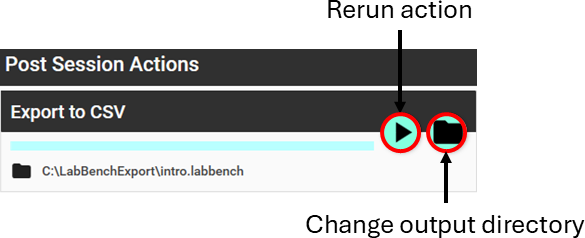
Figure 12:
LabBench Runner is used to perform experimental sessions. One an experiment has been created and configured this experiment will become available in the LabBench Runner.
Starting a session
When LabBench Runner is started it will first display the Startup Wizard (Figure 13). The Startup Wizards consists of up to five steps depending on which protocol elements have been enabled.
The Startup wizard will always start with the Experiment step, where you will be asked to select one of the experiments that are available on the computer. If the selected experiment has been localized then it will display the Language step, otherwise it will go to the Participant step. Localization refers to the tailoring of a protocol to a different cultures/language. When a protocol is localized all participant facing information can be shown according to the participants’ language and culture.
The Participant step consists of either create a new participant or selecting an existing participant. A new participant is created by specifying a participant ID that does not yet exist. It is possible to validate participant IDs with a rule that will prevent invalid IDs from being created.
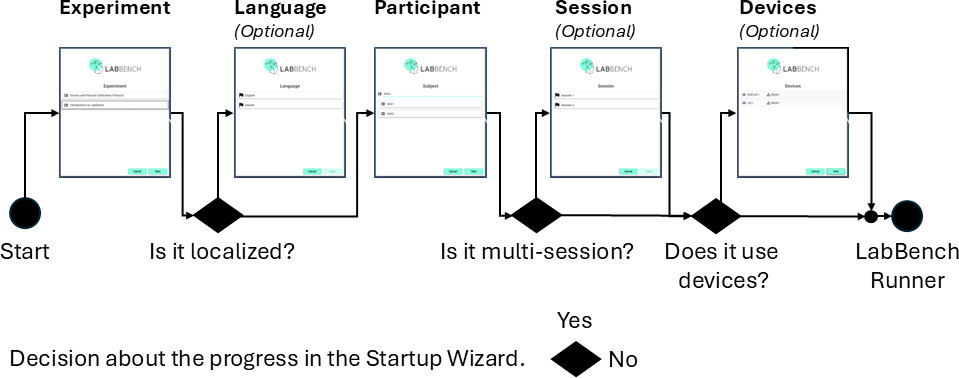
Figure 13:
Once the participant is either created or selected, the Startup Wizard will go to the Session steps if the experiment consists of multiple sessions, otherwise it will go to the Devices step. If the experiment does not contain sessions or devices the Startup Wizard will be completed once the subject is created or selected, and the main user interface of LabBench Runner will be open.
An experiment may contain of multiple sessions, each consisting of an individual set of experimental procedures for each session. These procedures do not need to be identical for all sessions, and by selecting the current session in the Session step only procedures belonging to that session will be displayed while the session is performed.
If the experiment requires devices to run, the Startup Wizard will end with the Devices step. In this step it will connect to an configure all required devices. If there errors with one or more devices the operator will be instructed in how to resolve these errors. Once all devices has been connected, configured and all errors if present has been resolved the Startup Wizard can be closed.
Overview of LabBench Runner
Once the Startup Wizard is closed the main user interface of the LabBench Runner will be opened. This user interface consists of four areas/windows; the Protocol Window, Test control and Information Window, Test Window, and Log window (see Figure 14)
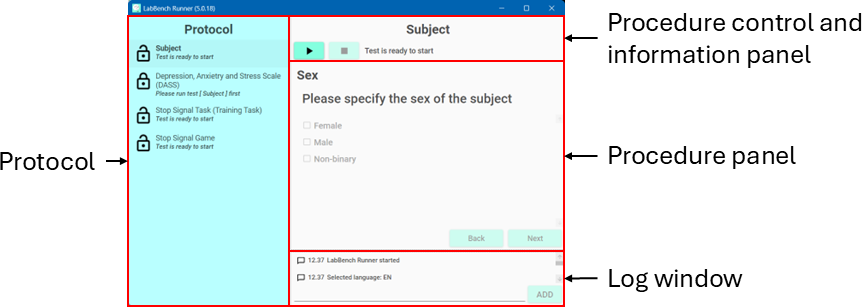
Figure 14:
Protocol
The Protocol Panel lists the tests that are included in the protocol. Each procedure provides information of the current procedure state, name, and instruction (please see Figure 15).
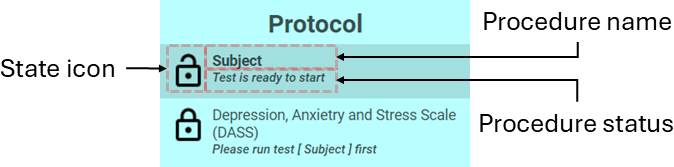
Figure 15:
When a procedure is not running, procedures can be selected by clicking on the procedure in the Protocol Panel. For each procedure the following information is displayed; 1) the name, 2) instruction, and 3) state.
The procedure name describes what is to be performed in protocol. The procedure instruction informs whether the procedure is ready to run. In case it is not ready to run, the instruction will inform the operator as to what actions are required to unlock the procedure to make it ready to run.
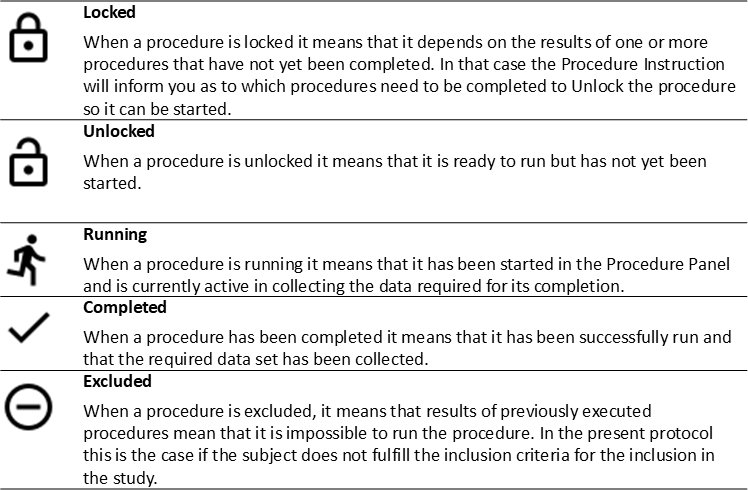
All procedures have a state, which can be either inactive or an active state. Inactive states are Locked, Unlocked, Completed, and Excluded states, and the active state is the Running state.
Only one procedure at a time can be in the Running state, and if a procedure is in the running state the Protocol Panel will be disabled, meaning it is not possible to select another procedure than the currently active procedure.
Below is a specification of the different procedure states:
Procedure control and information
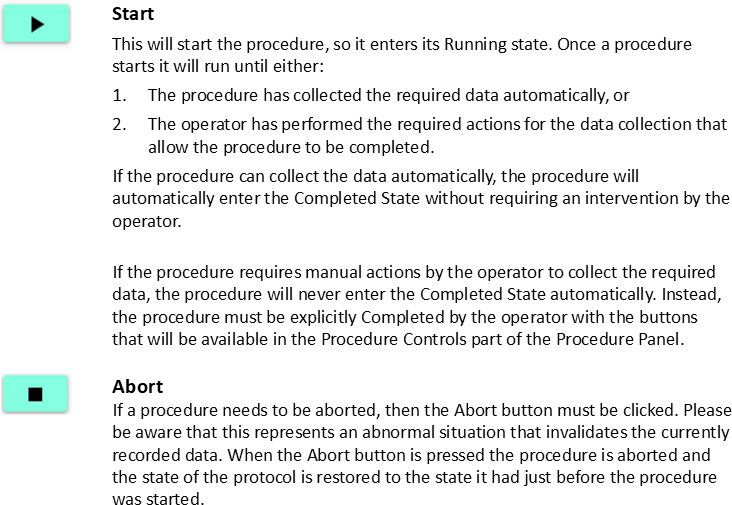
The Procedure Control and Information panel makes it possible to start and abort procedures (see Figure 16).
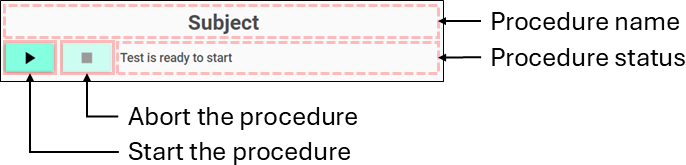
Figure 16:
Procedure panel
The content of the procedure panel is dynamic, and change based on which procedure is selected in the Protocol Window. The general principle is that it will be configured to what is required to perform the currently selected procedure. Consequently, this principle is what simplifies the user interface of LabBench Runner as it will always only contain the user interface elements required to perform the procedures that are in the protocol and nothing else.
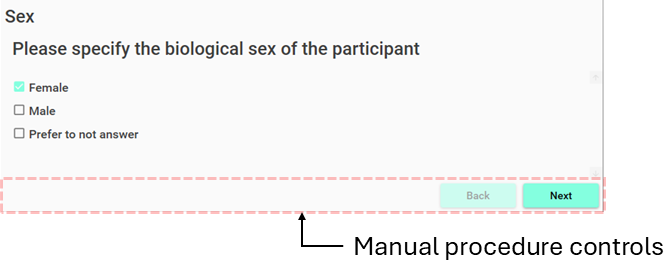
Figure 17:
Log window
LabBench has an extensive log system that automatically records log entries for all actions taken during an experiment, the execution of the experimental procedures, and the collection of experimental results. For events beyond the knowledge of LabBench, the experimenter can add manual entries to the log.
During an experiment the log is available in the Log Window, which is a list of log entries with the newest log entry on the top. These log entries are also stored in the internal data storage of LabBench, which contains all log entries for a given subject. However, the Log Window will only contain the log entries that have occurred since the start of the LabBench Runner.
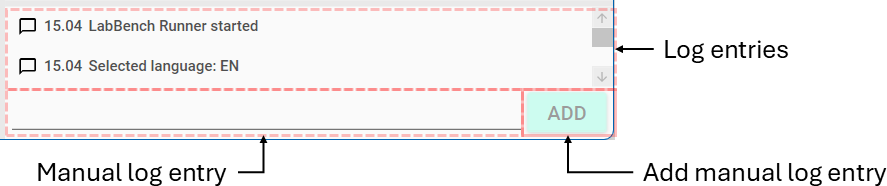
Figure 18
Analysis
Data from experiments can be exported either from the LabBench Designer or with post-session actions that are defined in the protocol.
The difference between exporting from LabBench Designer and with post-session actions is that the former will export all data for all subjects to a single file, whereas post-session actions will export data from each subject as individual files. Post-session actions are executed when the LabBench Runner is closed. However, if this fails, they can also be rerun from the LabBench Designer.
The present protocol has defined one post-session action named “Export to CSV”. This data can be imported into Excel, SPSS, R, or Python for further analysis and data visualization.
License
The Introduction to LabBench Protocol (introdemo@labbench.io) © 2024 by Inventors’ Way ApS is licensed under Creative Commons Attribution-NonCommercial-ShareAlike 4.0 International.
For a full explanation for the conditions of its use and the full license text, please refer to: Attribution-NonCommercial-ShareAlike 4.0 International