Experiments
Experiments are managed on the Experiments Page of LabBench Designer (see Figure 1). To the left, this page lists all the experiments that are currently present in the system. This list selects which experiment will be shown on the Experiment Panel on the right of the Experiments Page.
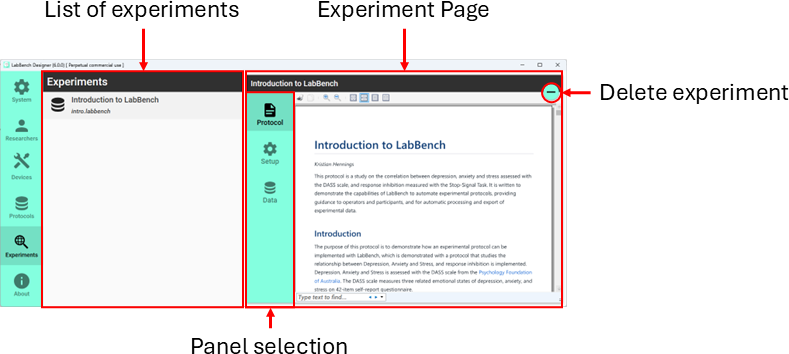
Figure 1: The Experiments Page in the LabBench Designer.
The Experiment Panel consists of tabs to the left that lets you choose between four tabs:
- Protocol: If a protocol description is available, it will be shown in this tab. This tab will allow you to read the description within LabBench Designer or to print it to a physical printer or a PDF file. If no protocol description is available, this tab will not be present for the experiment.
- Setup: The setup tab will always be present and allow you to configure the experiment. This includes configuring its validation of subject IDs, experimental setup, and post-session actions.
- Data: The data tab will always be present and show you a list of subjects. From this tab, it will be possible to delete subjects and export data from all subjects.
- Errors: This tab will only be present if there are errors, warnings or information regarding the experiment.
From the header of the Experiment Panel, it is also possible to delete the experiment by clicking the Delete Experiment button. As this action will irrevocably delete all data, a warning dialog will first be displayed, where you must confirm your deletion of the experiments before the system will delete it.
Protocol Panel
The protocol panel is only shown when a protocol description file can be retrieved from the repository (see Figure 2). A protocol description is an XML Paper Specification (.xps) file that is located at the same location as the Experiment Definition File (.expx) file with the same protocol ID/filename as the (*.expx) file.
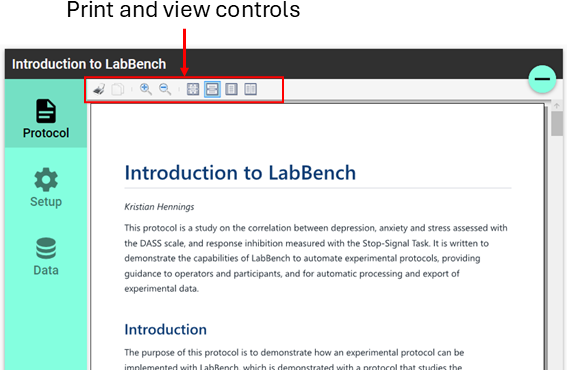
Figure 2: The Protocol Panel.
The Print and view controls toolbar in the top of the Protocol panel makes it possible to:
- Print the protocol description to a printer or save it as a PDF.
- Copy text from the protocol description.
- Increase/decrease the magnification.
- Set view to:
- Reset to 100% magnification.
- Page Width.
- While Page.
- Two Pages.
Setup Panel
The Setup Panel (see Figure 3) allows you to configure experiments and consists of sections for inspecting and configuring participant ID validation, operators, experimental setup, and post-session actions.
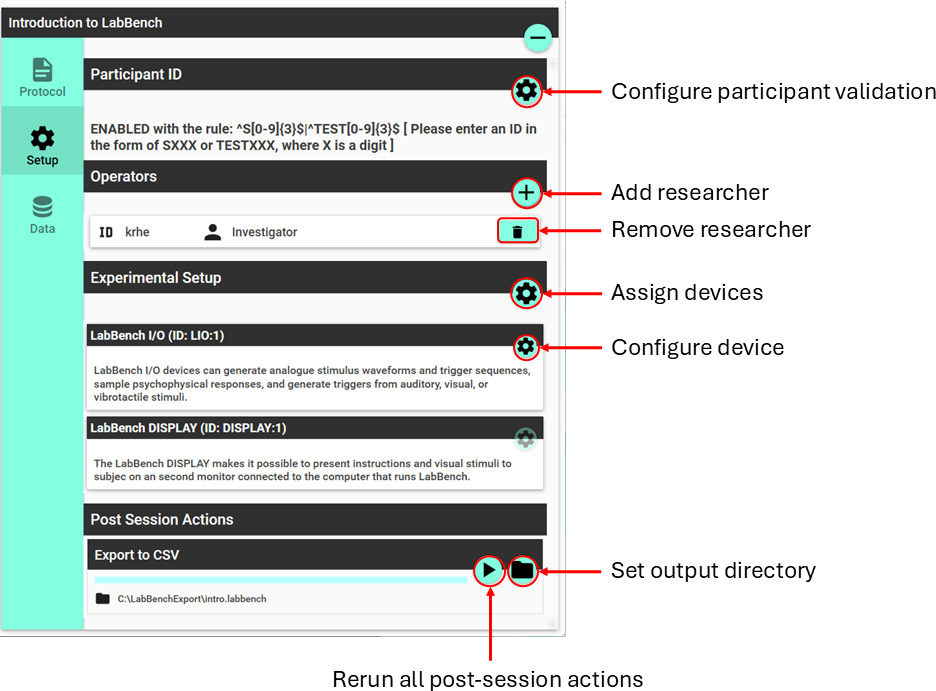
Figure 3: The Setup Panel.
Participant ID
The participant ID section on the Setup tab provides information on the validation performed in the experiment (see Figure 2). If this validation has not been defined in the protocol then it can be enabled or changed by clicking the Configure validation button.
Clicking the Configure participant validation button will open a dialog to enter the validation rule and a help text that LabBench Runner will display when an operator enters an invalid participant ID (see Figure 4).
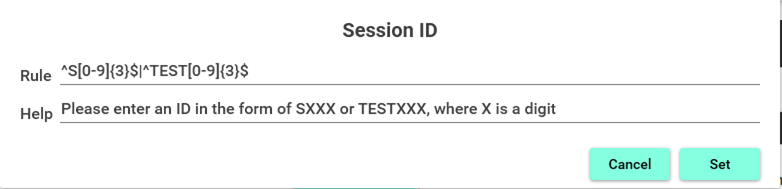
Figure 4: Configuration dialogue for Participant ID validation.
The rule must be specified as a regular expression. A useful tool for developing and testing regular expressions can be found at Regex 101 and tutorials to learn regular expressions at Regex Learn. Regular expressions are a very powerful albeit complex tool that can be used to search and validate text.
Operators
The Operators section is available if Access Control has been enabled. The Operators section lets you add and remove researchers from the experiment.
To add a researcher click the Add reseacher button, this will open the dialogue shown in Figure 5.
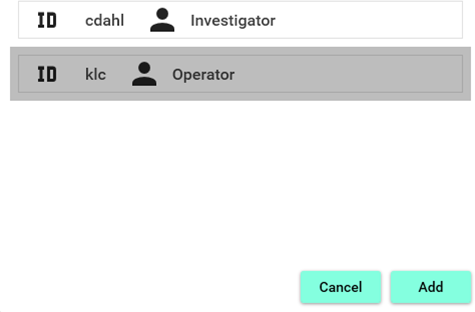
Figure 5: Adding researchers as operators.
To remove a researcher click the Remove researcher button.
Experimental setup
The devices used in the protocol for the experiment are shown in the Experimental Setup section, where each device must be assigned to a device that has been added to the system on the Devices tab in LabBench Designer.
When the experiment is created, a default assignment is made, where the first available device of each required type is automatically assigned to that type in the experimental setup. In many cases, only one instance is available for each device type, and in those cases, the default assignments are most often correct. However, if these default assignments are incorrect they can be modified by clicking the Assign devices button. This will open the dialogue shown in Figure 6.
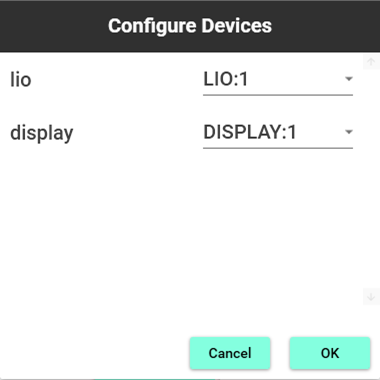
Figure 6: Assignment of devices to logical devices in the protocol (Assign devices dialogue).
The Assign devices dialogue allows you to assign physical devices to each device in the experimental setup. Some devices also have a configuration that can be changed by their Configure device button —currently, the following devices can be configured:
LabBench I/O
The LabBench I/O can generate triggers for external 3rd-party equipment, such as EEG amplifiers, on its TRIGGER INTERFACE port. This 3rd party equipment has different requirements for voltage levels (5.0V/TTL)/(3.3V/CMOS) and logic convention (positive/negative logic).
The Configure device button for the LabBench I/O will open the dialogue shown in Figure 8 that will allow you to configure the INTERFACE port of the LabBench I/O device.
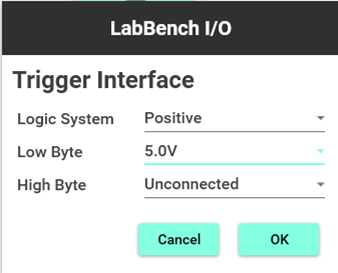
Figure 8: Configuration of the INTERFACE port.
Joystick
Participants can use a standard USB Joystick to complete questionnaires and provide answers in response tasks to estimate psychophysical functions and/or thresholds. However, there is no standard for the codes assigned to the USB buttons. Consequently, protocols written for one brand of USB joystick are unlikely to work with other brands of USB buttons.
To use a joystick brand other than the one the protocol was initially written for, you can change the codes assigned to each button. To change the codes, click the Configure device button for the Joystick, which opens the dialogue shown in Figure 8.
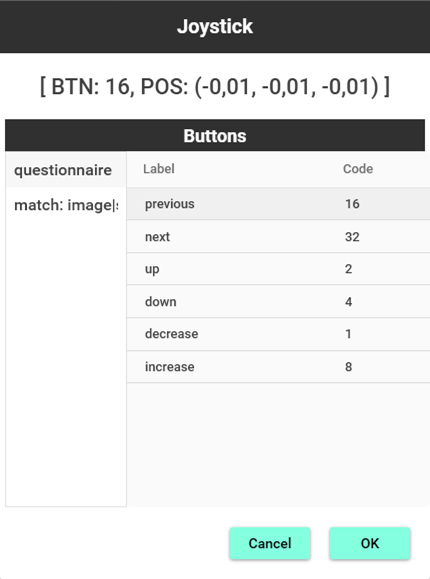
Figure 8: Configuration of Joystick parameters.
When using this dialogue, it is beneficial to have the joystick connected to the computer. This allows you to press buttons on the joystick and see their code(s) at the top of the dialogue. This allows you to identify the correct codes to enter in the button map shown in the lower half of the dialogue. Click OK to update the button maps; if you click Cancel, your changes will be discarded.
Post-session actions
Post-session actions are actions that are performed when LabBench Runner are closed. Currently, it is possible to include the following post-session actions in protocols:
- Export Data: This action will export the data from a single subject in either MATLAB format (.mat) or Java Script Object Notation format (.json).
- Export CSV: This action will export selected data to a comma-separated values file (*.csv). A calculated parameter in the export action must define each value in the CSV file.
- Export Log: This action will export the experimental log for the subject as a PDF file.
- Generate PDF: This action will generate a PDF file defined in the protocol. This can be used to, for example, generate immutable audit records or reports of results.
- Copy File: This action will copy a file from one place in the filesystem to another. This can be used to for example copy generates files to a shared network drive, or similar.
- Run Script: This action will run a Python script that most likely can do anything impossible with one of the other post-session actions.
The post-session actions can be configured and rerun from the Post-Session Action section of the Setup tab on the Experiment Panel (please see Figure 7).

Figure 7: Post-session action section of the Setup tab on the Experiment Panel.
The post-session action section allows you to set the output directory for each action. It also allows you to rerun an action on all subjects in an experiment. If, for some reason, a post-session action fails when LabBench Runner is closed, then rerunning the action from LabBench Designer can ensure that its data is generated for all subjects, including the subjects for which it failed.
Data Panel
Data for an experiment can be managed on the Data panel (please see Figure 8). This tab contains a list of all the subjects that have participated in the experiment.
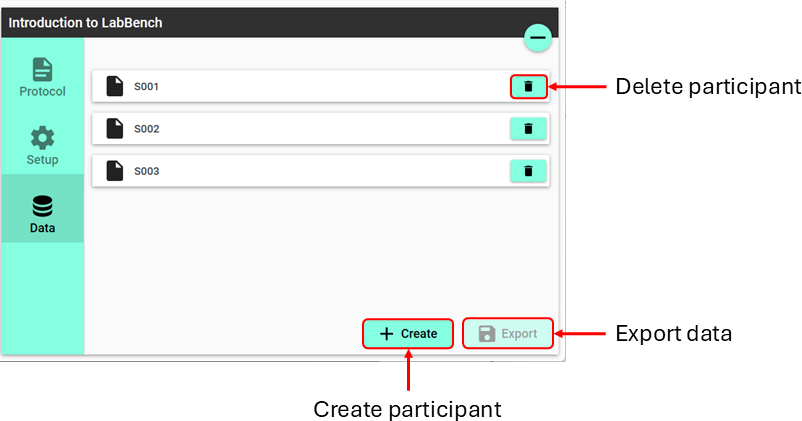
Figure 8
Exporting data
To export data for all participants, click the “Export data” button. This will open a file save dialog for where to save the exported data file.
The format for the data is determined by the file ending:
- mat: Data will be exported in MATLAB data format.
- json: Data will be exported in Java Script Object Notation.
- hd5: Data will be exported in Hierarchical Data Format.
- csv: This format is only available if a CSV export post-session action is defined in the protocol for the experiment. If present, this will export all subjects in the same CSV format as the single subject CSV export post-session action.
Create participant
Participants can be created by clicking the Create participants button. This will open a dialogue that lets you create a new participant. The identifier for the participant will be validated accordingly to the <participatent-validation> element in the Experiment Defition File (*.expx).
Delete participant
Participants can be deleted by clicking the Delete Subject button on the subject. Because this is an irrevocable action, you will be prompted to confirm the deletion in a dialogue before the participant is deleted. This is to guard against accidental clicks on the Delete participants button.