General
General purpose tests with functionality that extends across multiple application domains.
LabBench procedures are the basic building blocks of a protocol, where each procedure implements a specific type of experimental procedure that can be configured with parameters and extended by Python scripts. These procedures are the central elements of the Experiment Definition File, which describes the experimental procedures that will be performed in the experiment. These procedures are written in the <procedures> element of the Experiment Definition File.
Procedures implements experimental procedures with code that can be configured through the Experiment Definition File (*.expx) and extended with Python.
| Domain | Procedure | Description |
|---|---|---|
| General | Questionnaire | A questionnaire is a series of questions to collect information in a consistent and organized way. |
| Sequential | Custom-defined experimental procedures implemented with a state machine and functionality in Python code. | |
| Stimulation Sequence | Sequences of stimuli where the stimuli and their pattern are known when the test is started. | |
| Psychophysics | Cold Pressor | The cold pressor procedure is an experimental procedure in which a participant immerses a hand or forearm in ice-cold water to induce controlled pain or stress, allowing researchers to measure physiological and behavioral responses. |
| Manual Threshold Estimation | Threshold estimation where LabBench cannot automatically deliver the stimuli. Instead, the experimenter is guided through an adaptive algorithm on which stimuli to present to the subject. | |
| Response Recording | Recording of psychophysical responses. The recording can be combined with sampling of biophysical signals, stimulus delivery, and marking of events. | |
| Stimulus Presentation | Manual presentation of stimuli that can be used to familiarize a subject with the stimuli and set initial stimulation intensities for subsequent tests. | |
| Threshold Estimation | Estimation of thresholds and psychometric functions with adaptive algorithms where the stimuli can be automatically delivered to the subject. | |
| Cuff Pressure Algometry | Stimulus Response | Psychophysical rating of linearly increasing pressure until the pain tolerance threshold or limit is reached. This procedure can be used to determine pressure pain detection and tolerance thresholds. |
| Temporal Summation | Psychophysical rating of pressure stimuli given in quick succession that evokes temporal summation. | |
| Arbitrary Temporal Summation | Psychophysical rating of pressure stimuli that evoke temporal summation. These stimuli are given in quick succession, where the timing and intensity of each stimulus can be specified. | |
| Static Temporal Summation | Psychophysical rating of a rectangular static pressure stimulus. | |
| Conditioned Pain Modulation | Psychophysical rating of linearly increasing pressure that is being conditioned by a second continuous pressure stimulus until the pain tolerance threshold or limit is reached. This procedure can be used to determine pressure pain detection and tolerance thresholds. | |
| Stimulus Rating | Determination of pain detection and/or tolerance thresholds to linearly increasing pressure. Participants indicate the thresholds through button presses. | |
| Conditioned Pain Modulation Rating | Determination of pain detection and/or tolerance thresholds to linearly increasing pressure conditioned by a second static pressure. Participants indicate the thresholds through button presses. |
Procedures can be in one of the following states:
| Symbol | State | Definition |
|---|---|---|
 |
ready |
The procedure is ready to run and has not been completed yet. |
 |
blocked |
The procedure depends on one or more procedures that has not yet been completed. Dependencies to procedures is declared in the <dependencies> element. |
 |
excluded |
The procedure defined a condition with the <condition> element that must be satisfied in order for the procedure to be included in the session. This condition is not satisfied, and consequently, the procedure has been excluded from the session. |
 |
running |
The procedure is currently running, which means it is in the process of performing the experimental procedure that it describes. Only one procedure can be running at any time, and when it is running the protocol window is locked and the procedure cannot be deselected in LabBench Runner. |
 |
completed |
The procedure has been completed, and the collected data has been automatically saved to the subject’s data set. In the completed state, the procedure can be rerun, causing it to reenter the running state and record new data. If it completes, this new data will replace the currently recorded data for the procedure. |
Definition of procedures consists of elements and attributes common to all tests regardless of their type and elements and attributes specific to the type of procedure being specified. The attributes and elements common for all procedures are shown in the code listing below:
<procedure-type id="[Required: Identifier of the procedure]"
    name="[Required: Human understandable name of the procedure]"
    session="[Optional: ID of the session the procedure belongs to]"
    experimental-setup-id="[Optional: Experiment Setup Configuration Identifier]">

    <procedure-events> <!-- Contents omitted for brevity --> </procedure-events>
    <properties> <!-- Contents omitted for brevity --> </properties>
    <dependencies> <!-- Contents omitted for brevity --> </dependencies>
    <condition> <!-- Contents omitted for brevity --> </condition>

    <!-- Additional procedure-type-specific elements -->
</procedure-type>
Procedures have four common attributes:
| Attribute | Type | Function |
|---|---|---|
id |
string | This required attribute is identifier (ID) of the procedure in the protocol. This ID must be unique. |
name |
string | This required attribute is the name of the procedure, which is the name that will be shown to the experimenter in the protocol window of the LabBench Runner program. |
session |
string | This optional attribute specifies which session the procedure belong to. If specified the procedure will only be shown in the protocol window if the active session is equeal to the session specified by this attribute. |
experimental-setup-id |
string | This optional attribute sets which experimental setup device configuration that will be active while the procedure is running. |
The <dependencies> element is used to prevent procedure from running if the procedure depends on results from procedures that have not yet been completed.
The second common element is the <condition> element. This element place a condition on the inclusion of a procedure in experimental sessions, and thus makes it possible to excludes procedures from a protocol if they cannot be performed.
The <procedure-events> element is used to specify Python scripts that are executed when procedures are selected, started, completed, or aborted. This can be used to extend procedures with functionality outside the scope of what the procedure was originally designed for. To illustrate their use, an example where the base functionality of a <stimulation-sequence> procedure is extended with procedure events is provided in the code listing below:
<stimulation-sequence ID="Cond"
                      name="Conditioning"
                      stimulus-update-rate="20000"
                      response-collection="none">
    <procedure-events start="func: Functions.Condition(tc)"
        abort="func: Functions.Stop(tc)"
        complete="func: Functions.Stop(tc)">

        <instrument interface="pressure-algometer" />
    </procedure-events>

    <stimulation-pattern time-base="seconds">
        <uniformly-distributed-sequence iterations="12"
                                        Toffset="5"
                                        minTperiod="10"
                                        maxTperiod="15" />
    </stimulation-pattern>

    <stimuli order="round-robin">
        <stimulus name="Stimulus"
                  count="1"
                  intensity="StimIntensity.Intensity">
            <!-- Stimulus specification omitted for brevity -->
        </stimulus>
    </stimuli>
</stimulation-sequence>
The <stimulation-sequence> procedure is intended to generate evoked potentials by presenting a set of stimuli to the subject according to a given stimulation pattern. The procedure is intended to work only with short electrical, auditory, or visual stimuli suitable for generating an evoked potential, which can be used, for example, EEG experiments with the oddball paradigm, electrically evoked potentials, etc.
One research group wanted to study how electrically evoked potentials are modulated by a conditioning pressure pain stimulus, which the built-in functionality of the <stimulation-sequence> procedure cannot do. The built-in functionality does have any mechanism that provides a way to apply a stimulus for the entire procedure duration, as it is only intended for short stimuli that are applied according to a stimulation pattern.
In their study, they wanted to use a LabBench CPAR+ device to apply a conditioning pain stimulus while electrically evoked potentials were generated with a DS7 stimulator. This was made possible with a procedure event that ran a script starting the conditioning stimulus when the procedure was started and stopping it when the procedure was stopped or aborted. The <procedure-event> has three attributes start, abort, complete that is executed when the procedure is started, aborted, and completed, respectively.
These attributes can contain either a single-line Python statement or reference a function in a Python script. Starting and stopping the pressure stimuli is too complicated to achieve in a single Python code line. Instead, a Python function was called to start and stop the stimulation. Using Python functions, and scripting in general, is first discussed in the section “Scripting”; however, for completeness, the code for these functions is provided in code listing below:
def Condition(tc):
    dev = tc.Instruments.PressureAlgometer
    chan = dev.Channels[0]
    pressure = 0.70 * tc.SR.PTT

    chan.SetStimulus(1, chan.CreateWaveform().Step(pressure, 9.9 * 60))
    dev.ConfigurePressureOutput("outlet-1", "channel-1")
    dev.ConfigurePressureOutput("outlet-2", "none")
    dev.StartStimulation("stop-when-button-pressed", True)

    tc.Log.Information("Starting conditioning: {intensity}", pressure)
    return True

def Stop(tc):
    tc.Instruments.PressureAlgometer.StopStimulation()
    return True
In the section “Scripting”, we will introduce in detail how Python is used for scripting protocols and to extend the functionality of LabBench. Consequently, if you have never programmed in Python, the code in the listing above may be new to you.
The example in the code listing above defines (“def”) two functions, Condition(tc) and Stop(tc), that is intended to start and stop the pressure stimulus, respectively. What causes these functions to be called from the <procedure-event> is that, for example, the start attribute contains func: Functions.Condition(tc). The func: statement is a keyword that tells LabBench that a Python function must be called, which in this case is the Condition(tc) function located in the Functions script.
In this case, the procedure event is used to condition/modulate evoked potentials. However, as procedure events are common to all procedures, this procedure event could be inserted into any other LabBench procedure.
For example, if we wanted to see how a simultaneous painful stimulus influences the responses to the DASS scale, it could be inserted into the <questionnaire> test. Furthermore, procedure events do not need to be used to apply a stimulus to a subject. If we need general code to run when a procedure starts, we can run it in the start procedure event.
The start procedure event could be used, for example, to initialize a random sequence of visual stimuli or similar, or if we want to add custom information to the log system, custom data to the data set, then that can also be accomplished with procedure events.
The <properties> element is an optional element that can be used for modifying the execution of procedures. The code listing below provides an overview of all possible procedure properties and their attributes:
<properties>
    <next id="[Required: dynamic text]"/>
    <auto-start value="[Required: true or false]" />
    <time-constraint [ attributes omitted for brevity ] />
    <instructions [ attributes omitted for brevity ]/>
    <participant-instructions [ attributes omitted for brevity ] />
    <annotations> <!-- Contents omitted for brevity --> </annotations>
</properties>
The <next> element is included to support the logical flow of the protocol when procedures have been excluded. By default, when a procedure is completed, LabBench will select the next procedure in the protocol unless the <next> element is used for the completed procedure.
If the <next> element is used, its id attribute must be the ID of the next procedure to select when the procedure is completed and because this property can be scripted, it is possible to select this ID at runtime depending on the previous results in the protocol.
Consequently, if the results of, for example, a <questionnaire> procedure have caused a procedure to be excluded, then the <next> element can be used to skip this procedure and select the correct next procedure in the protocol instead of the procedure that has been excluded.
The <auto-start> property can be used to chain procedures. LabBench will automatically select the procedure in the protocol when a procedure is completed. Setting the value attribute to true on the <auto-start> attribute will cause the procedure to start automatically when it is selected after the previous procedure has been completed.
Combined with the <next> property, this can be used to create protocols that run automatically from their beginning to their end.
Time constraints can be placed on the execution of procedures with the use of the <time-constraint> element:
<time-constraint procedure-id="[Required: ID of the procedure on which the constraint is relative to]"
    min="[Optional: minimal time that must pass before the procedure can be started]"
    max="[Optional: maximal time that can pass whithin which the procedure can still be started]"
    notification="[Optional: true or false]"
    time-reference="[Optional: is the time-constraint relative to a procedures' start or completion]" />
Time constraints limit when a procedure can be started based on the time elapsed since either the start or completion of another procedure in the protocol. The procedure that this limit is relative to is specified by the procedure-id attribute.
The min and max attributes specify the time limit for the start of the procedure:
| Min | Max | Time limit |
|---|---|---|
| Yes | Yes | The procedure can first be started when min time has elapsed, and must be started before max time has elapsed. |
| Yes | No | The procedure can first be started when min time has elapsed. |
| No | Yes | The procedure must be started before max time has elapsed. |
| No | No | Invalid: a <time-constraint> element must specify either a min or a max time, or both. |
The notification attribute controls whether a notification is provided (a beep) when the procedure changes state from being prevented from being started to being able to be started. The time-reference attribute controls whether the time constraint is relative to the start (start) or completion (end) of the procedure specified with the test-id attribute.
All procedures support displaying information to the operator when they are selected and not running.
The <instructions> element is used to enable the showing of instructions to the researcher in the procedure panel in LabBench Runner:
<instructions default="[Optional: default instructions]"
              blocked="[Optional: instructions in the blocked state]"
              ready="[Optional: instructions in the ready state]"
              excluded="[Optional: instructions in the excluded state]"
              completed="[Optional: instructions in the completed state]"
              override-results="[Optional: true or false]"
              start-instruction="[Optional: text for starting and restarting the procedure]" />
The <instructions> element support showing different instructions depending on the procedure state, where each instruction is defined by an attribute named after the procedure state. If not defined the instructions defined with the default attribute will be shown, and if this attribute is not defined then no instruction will be shown. The default, blocked, ready, excluded, completed attributes are all calculated attributes that must return either an image or an RTF document.
By default, selecting a completed procedure will display its results; however, this behaviour can be overridden by the override-results attribute to true, which will always display instructions when the procedure has been completed. The start-instruction property can be used to modify the instruction given to the researcher when a procedure is selected and can start. By default, LabBench will display “Procedure is ready to start” when a procedure can be started, but if the start-instruction attribute is used, then this can be used to display a custom message. As this attribute can be scripted, this message can also depend on previous results recorded in the protocol.
All procedures support displaying instructions to participants on a secondary monitor (ImageDisplay) when the procedure is not in the running state. The <subject-instructions> element is used to enable the showing of instructions to participants:
<participant-instructions default="[Optional: default instructions]"
    blocked="[Optional: instructions in the blocked state]"
    ready="[Optional: instructions in the ready state]"
    excluded="[Optional: instructions in the excluded state]"
    completed="[Optional: instructions in the completed state]" />
The <participant-instructions> element support showing different instructions depending on the procedure state, where each instruction is defined by an attribute named after the procedure state. If not defined the instructions defined with the default attribute will be shown, and if this attribute is not defined then no instruction will be shown. The default, blocked, ready, excluded, completed attributes are all calculated attributes that must return an image.
The <annotation> property does not influence how a procedure is executed. Instead, it can add information to the procedure that will be exported with the results. This can be used, for example, if a strength-duration curve is determined to specify the duration of the stimuli used in the test. Adding numbers, Boolean values, text strings, and a list of numbers as annotations to a test is possible. The listing below provides an example of all possible procedure annotations:
<annotations>
    <bool name="ChargeBalanced" value="true"/>
    <bools name="IncludedInTest">
        <bool value="true" />
        <bool value="false" />
    </bools>
    <integer name="NumberOfTrials" value="10">
    <integers name="StimuliInTrials">
        <number value="5" />
        <number value="6" />
        <number value="3" />
    </integers>
    <number name="ChargeBalRatio" value="4.0"/>
    <numbers name="Ts">
        <number value="0.1"/>
        <number value="0.2"/>
        <number value="0.5"/>
        <number value="1.0"/>
    </numbers>
    <string name="string" value="This is the value of the text string"/>
    <strings name="Labels">
        <text value="A" />
        <text value="B" />
        <text value="C" />
    </strings>
</annotations>
However, while annotations can be specified in the Experiment Definition File in the format of the code listing above, the most common use of annotations is to add annotations programmatically to procedure results from a function defined in a Python script. Adding annotations programmatically can be used to add data from, for example, the completed procedure event.
When procedures are extended with Python code this often results in custom data that is not saved automatically, but instead must be added to the test annotations. Below is an example of how data from a Stop Signal Task to the result of a Stimulation Sequence procedure:
class StopSignalTask:
    def __init__(self, tc, algorithm, feedback, triggers):
        self.result = tc.Current

        # Task setup omitted for brevity ...

        self.Log.Information("Stop Signal Task [ CREATED ]")

    def Complete(self):
        self.result.Annotations.SetIntegers("sstGoSignals", self.goSignals)
        self.result.Annotations.SetBools("sstAnswer", self.answer)
        self.result.Annotations.SetIntegers("sstTime", self.time)
        self.Log.Information("Stop Signal Task [ SAVED ]")
Functionality for the generation of stimuli (Stimulator instrument) and triggers (TriggerGenerator instrument) is implemented not by the individual procedures but by procedure components that are called from the procedures. The use of procedure components ensures that triggers and stimuli are specified in the same format across all procedures in the LabBench Language.
Trigger and stimulus generation are implemented by two separate procedure components that must be correctly synchronised. If both triggers and stimuli are to be generated simultaneously, they must be started at the same time. For that to happen, the generation order is important: triggers are generated first, followed by stimuli. Consequently, if both are defined, trigger generation must be driven by stimulus generation. This is accomplished by setting the trigger-source of the trigger generation component to internal.
Configuration of trigger sources is done with the <configuration> element:
<configuration>
    <trigger-generation trigger-source="internal" />
    <stimulation-generation trigger-source="none" />
</configuration>
This is the configuration pattern to use when triggers must be synchronised with stimuli. Setting the trigger-source for the trigger generation component to internal tells it to wait until something triggers the stimulus generation component. In the example above, the trigger-souce for the stimulus generation component is set to none, which means that it will not wait and will be triggered immediately. An alternative is to set it to trigger on a received trigger signal (external), a button press (button), or a trigger event received on a response port (response-port1-4).
Please note, it is almost always an error to set the trigger-source of both components to none as this means both trigger and stimulus generation will be executed immediately with no synchronisation between them.
The available trigger options are described in the table below:
| Value | Definition |
|---|---|
none |
The trigger or stimulus generation will start immediately when the component is executed. This means the generation is entirely software-controlled, with no synchronisation with other components or external events, such as button presses or trigger events from response ports. |
internal |
The trigger source is internal to the device, meaning the trigger is the execution of another component within the device. Please note that this trigger source is currently relevant only for the trigger generation component, as it is always executed before the stimulus generation component. Setting this trigger source for the stimulus generation component will cause it to wait forever, since it is the last component to execute. |
external |
The trigger source is a trigger received on a TRIGGER INPUT connector on the device. This trigger source synchronises the trigger and/or stimulus generation with other devices. |
button |
The trigger source is a press on a button connected to a response port. Please note that it does not matter which response port the button is connected to. |
response-portX |
The trigger source is a trigger event received from a device connected to a specific response port. Please note that a button press is not a trigger event; consequently, if the component should be triggered by a button press, then the button trigger source must be used instead. |
Stimuli for the stimulus generation component are specified within <stimulus> elements:
<stimulus>
    <!-- composition of stimuli -->
</stimulus>
Stimuli can be composed of the following elements:
| Stimulus | Description |
|---|---|
<pulse> |
A rectangular stimulus that is defined by its intensity (Is), duration (Ts), and delay (Tdelay). |
<ramp> |
A linearly increasing stimulus that is defined by its initial offset (Ioffset), intensity (Is), duration (Ts), and delay (Tdelay). |
<sine> |
A sinusoidal stimulus that is defined by its intensity (Is), duration (Ts), delay (Tdelay), and frequency (Frequency). |
<arbitrary> |
A stimulus that can be any waveform described by a mathematical expression (expression) with duration (Ts) and delay (Tdelay). |
<window> |
A window function applied to a stimulus; it’s defined by its type (window) and parameter (parameter). |
<combined> |
Creation of a stimulus that is a combination of two or more stimuli. |
<repeated> |
Repetition of an enclosed stimulus, which can be a single stimulus, a combined stimulus, or other repeated stimuli. This enables the creation of arbitrary stimulation patterns and waveforms. |
Most of the attributes of these elements are calculated attributes that take two parameters: the program context and a free parameter x. The role of the free parameter x depends on the procedure that uses the component. In threshold estimation procedures, the free parameter x is the value that the threshold estimation algorithm adjusts to find the threshold.
A pulse stimulus generates a constant signal with intensity Is for the duration Ts. Outside this interval, the stimulus is zero.
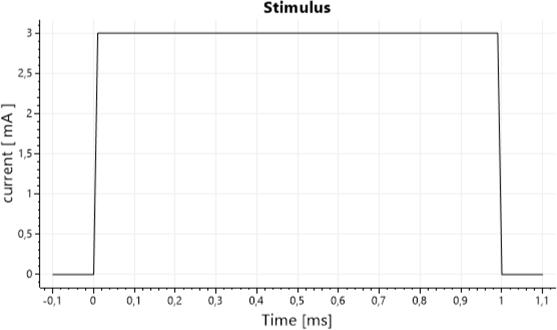
The stimulus is declared with the <pulse> element:
<stimulus>
    <pulse Is="x" Ts="1" Tdelay="0" />
</stimulus>
A <pulse> stimulus is defined by the following attributes:
| Attribute | Type | Specification |
|---|---|---|
Is |
double = Calculated(context, x) | The intensity of the stimulus. |
Ts |
double = Calculated(context, x) | The duration in milliseconds of the stimulus. |
Tdelay |
double = Calculated(context, x) | The delay in milliseconds with respect to its parent stimulus. |
A ramp stimulus generates a linearly increasing (or decreasing) signal over time. The stimulus starts at Ioffset and changes linearly to Ioffset + Is over the duration Ts. Outside this interval, the stimulus is zero.
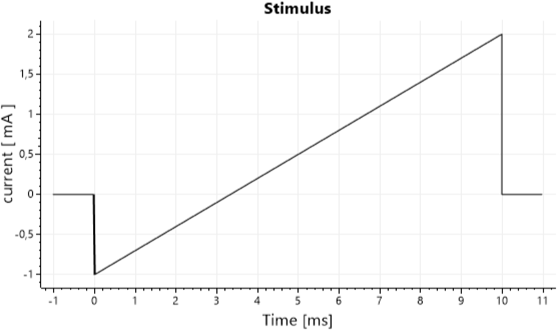
The stimulus is declared with the <ramp> element:
<stimulus>
    <ramp Is="x" Ts="10" Tdelay="0" Ioffset="-1" />
</stimulus>
A <ramp> stimulus is defined by the following attributes:
| Attribute | Type | Specification |
|---|---|---|
Is |
double = Calculated(context, x) | The intensity of the stimulus. |
Ts |
double = Calculated(context, x) | The duration in milliseconds of the stimulus. |
Tdelay |
double = Calculated(context, x) | The delay in milliseconds with respect to its parent stimulus. |
Ioffset |
double = Calculated(context, x) | The intensity offset for the ramp stimulus. The stimulus will be equal to Ioffset at its onset and equal to Ioffset + Intensity at its cessation. |
A sine stimulus generates a sinusoidal signal with amplitude Is and frequency Frequency over the duration Ts. Outside this interval, the stimulus is zero.
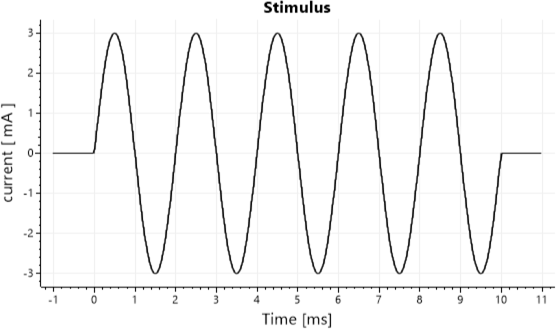
The stimulus is declared with the <sine> element:
<stimulus>
    <sine Is="x" Ts="10" Tdelay="0" Frequency="500" />
</stimulus>
A <sine> stimulus is defined by the following attributes:
| Attribute | Type | Specification |
|---|---|---|
Is |
double = Calculated(context, x) | The intensity of the stimulus. |
Ts |
double = Calculated(context, x) | The duration in milliseconds of the stimulus. |
Tdelay |
double = Calculated(context, x) | The delay in milliseconds with respect to its parent stimulus. |
Frequency |
double = Calculated(context, x) | The frequency [Hz] of the sine wave. |
An arbitrary stimulus is defined by its waveform, which is specified directly by a mathematical expression of time. The expression is evaluated over the interval [0, Ts], yielding the stimulus value at each time point. Outside this interval, the stimulus is zero.
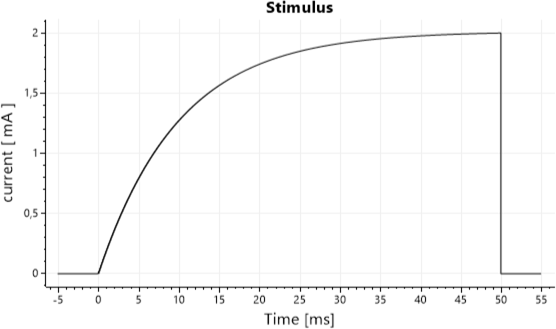
The stimulus is declared with the <arbitrary> element:
<stimulus>
    <arbitrary Ts="50" Tdelay="0" expression="x * ((1 - exp(-t/10))/(1 - exp(-50/10)))" />
</stimulus>
A <arbitrary> stimulus is defined by the following attributes:
| Attribute | Type | Specification |
|---|---|---|
expression |
double = Expression | Mathematical expression that defines the waveform of the stimulus. |
Ts |
double = Calculated(context, x) | The duration in milliseconds of the stimulus. |
Tdelay |
double = Calculated(context, x) | The delay in milliseconds with respect to its parent stimulus. |
The arbitrary stimulus is defined by the mathematical expression specified for its expression attribute. This expression must be a single-line Python expression that returns the stimulus value at time t, which is used to calculate the waveform for the stimulus between time 0 and time Ts. Outside this interval, the stimulus will be zero.
In the scope of this expression are the following variables:
| Variable | Type | Specification |
|---|---|---|
x |
double | |
t |
double | |
C |
object | |
[Test ID] |
Result | |
[Variable Name] |
object |
In the scope are also the following functions which can be called from the expression:
| Function | Description |
|---|---|
| exp(x) | Returns e^x. Returns +∞ if x is large positive, 0 if x is large negative. NaN propagates. |
| round(x) | Rounds x to the nearest integer using banker’s rounding (midpoints round to nearest even). NaN propagates. |
| ceiling(x) | Returns the smallest integer ≥ x. ±∞ and NaN are returned unchanged. |
| floor(x) | Returns the largest integer ≤ x. ±∞ and NaN are returned unchanged. |
| truncate(x) | Removes fractional part (toward zero). ±∞ and NaN are returned unchanged. |
| log(x) | Natural logarithm (base e). x > 0 → valid; x = 0 → -∞; x < 0 → NaN; NaN propagates. |
| log10(x) | Base-10 logarithm. Same domain as log(x): x > 0 → valid; x = 0 → -∞; x < 0 → NaN. |
| sin(x) | Sine of x (radians). Defined for all finite x. ±∞ → NaN; NaN propagates. |
| sinh(x) | Hyperbolic sine. Large |
| asin(x) | Arcsine in radians. Domain: -1 ≤ x ≤ 1. Outside → NaN. |
| cos(x) | Cosine of x (radians). Defined for all finite x. ±∞ → NaN; NaN propagates. |
| cosh(x) | Hyperbolic cosine. Large |
| acos(x) | Arccosine in radians. Domain: -1 ≤ x ≤ 1. Outside → NaN. |
| tan(x) | Tangent of x (radians). Undefined at odd multiples of π/2 (returns large finite values due to floating-point limits). ±∞ → NaN. |
| tanh(x) | Hyperbolic tangent. Approaches ±1 as x → ±∞. NaN propagates. |
| abs(x) | Absolute value of x. ±∞ → +∞; NaN propagates. |
| sqrt(x) | Square root. x ≥ 0 → valid; x < 0 → NaN; +∞ → +∞. |
| max(val1, val2) | Returns the larger value. If either input is NaN, result is NaN. |
| min(val1, val2) | Returns the smaller value. If either input is NaN, result is NaN. |
| pow(x, y) | Returns x^y. Negative x with non-integer y → NaN. 0^0 → 1. Large results may overflow to ±∞. NaN propagates. |
| step(x) | Returns 1 if x ≥ 0, otherwise 0. NaN returns 0 (comparison is false). |
| pulse(x, d) | Returns 1 if 0 ≤ x < d, otherwise 0. NaN in either argument returns 0. |
A window stimulus applies a shaping function to a nested stimulus, modifying its amplitude over time. This smoothly tapers the signal—typically reducing it to zero at the start and end—to avoid abrupt transitions.
Window functions are commonly used to reduce artefacts such as clicks in audio signals or sharp edges in stimulation by ensuring a gradual onset and offset of the waveform.
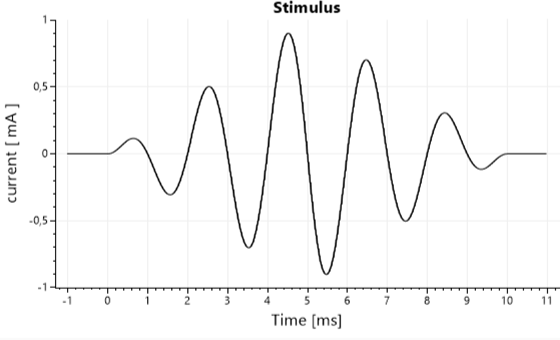
The stimulus is declared with the <window> element:
<stimulus>
    <window window="bartlett" parameter="1">
        <sine Is="x" Ts="10" Frequency="500" />
    </window>
</stimulus>
A <window> stimulus is defined by the following attributes:
| Attribute | Type | Specification |
|---|---|---|
window |
enum | Type of window to apply [bartlett, blackman, tukey]. |
parameter |
double = Calculated(context, x) | Window parameter, which applies to blackman and tukey window functions. |
A repeated stimulus replicates a nested stimulus multiple times at a fixed interval. The inner stimulus is played N times, with a period of Tperiod between repetitions. Outside the defined repetitions, the stimulus is zero.
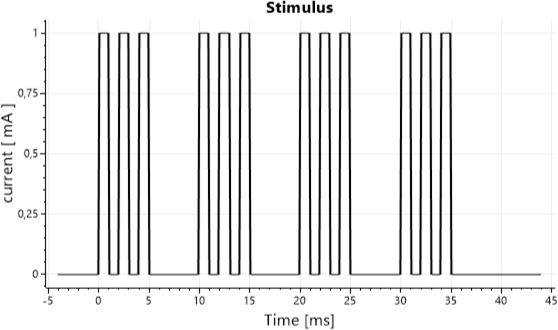
The stimulus is declared with the <repeated> element:
<stimulus>
    <repeated Tperiod="10" N="4" Tdelay="0">
        <repeated Tperiod="2" N="3" Tdelay="0">
            <pulse Is="x" Ts="1" />
        </repeated>
    </repeated>
</stimulus>
A <repeated> stimulus is defined by the following attributes:
| Attribute | Type | Specification |
|---|---|---|
Tperiod |
double = Calculated(context, x) | The period in milliseconds between the start of each repetition of the nested stimulus. |
N |
int = Calculated(context, x) | The number of times the nested stimulus is repeated. |
Tdelay |
double = Calculated(context, x) | The delay in milliseconds with respect to its parent stimulus. |
A combined stimulus superimposes multiple nested stimuli by summing their values over time. Each nested stimulus contributes to the total signal according to its own timing and parameters.
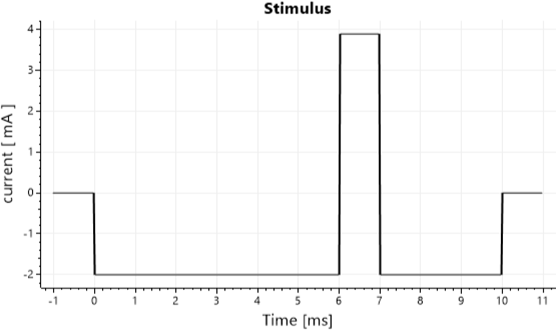
The stimulus is declared with the <combined> element:
<stimulus>
    <combined>
        <pulse Is="-2" Ts="10" />
        <pulse Is="x" Ts="1" Tdelay="6" />
    </combined>
</stimulus>
A combined stimulus has no attributes.
A repeated combined stimulus allows multiple stimuli to be combined into a single waveform and then repeated as a unit. The individual stimuli are first summed together, preserving their relative timing, and the resulting waveform is then repeated N times with a period of Tperiod. This makes it possible to construct more complex stimulation patterns from simpler building blocks.
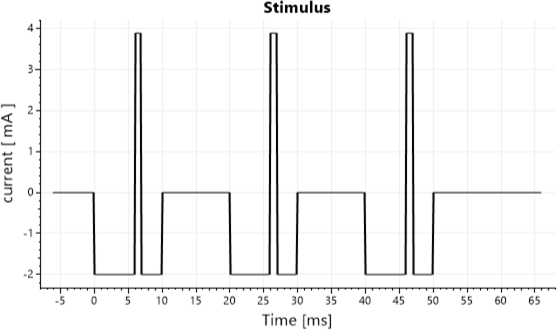
Complex repeated stimuli can be created by combining <repeated> and <combined> elements:
<stimulus>
    <repeated Tperiod="20" N="3">
        <combined>
            <pulse Is="-2" Ts="10" />
            <pulse Is="x" Ts="1" Tdelay="6" />
        </combined>
    </repeated>
</stimulus>
Custom stimulation allows full control over how a stimulus is delivered by delegating execution to a user-defined script. Instead of relying on the built-in stimulus generation component, the stimulus is passed to a script function, where it can be routed to one or more instruments and combined with other modalities.
This approach enables synchronized multi-modal stimulation, such as combining electrical stimulation with visual or other outputs, and supports integration with instruments beyond the standard stimulator.
The <scripts> element defines custom script functions that control how stimulation is initialised and executed. The initialize function is called once before stimulation begins and can be used to set up the state or prepare instruments. The stimulate function is called for each stimulus and is responsible for delivering the stimulus, typically by accessing the configured instruments and using the current context.
Nested
<scripts initialize
         stimulate="func: Script.Stimulate(context, x)">
    <instrument interface="stimulator" />
    <instrument interface="image-display" />
</scripts>
Even when using custom stimulation, stimuli can still be defined using the standard <stimulus> elements. The defined stimulus is evaluated as usual and made available within the script through context.Stimulus.
This allows the script to reuse stimulus definitions in Experiment Definition File, while controlling how and where the stimulus is delivered from Python code. For example, the evaluated waveform can be passed directly to an instrument, combined with other outputs, or conditionally applied within the Python function.
<stimulus>
    <pulse Is="x" Ts="1" Tdelay="0" />
</stimulus>
Within the Stimulate function, the evaluated stimulus is available through context.Stimulus and can be passed directly to instruments. In this example, the defined pulse stimulus is generated on the stimulator using the Generate command, while a visual cue is presented simultaneously via the image display.
In this example, the order is important. The stimulus is generated first and set to trigger on a trigger event on response port 2. A visual trigger (LabBench VTG) is connected to this response port. When the image is shown, it is displayed for 250ms, with a fiducial that triggers the LabBench VTG and thus generates the electrical stimulus. Consequently, the visual and electrical stimuli will be synchronised.
This demonstrates how standard stimulus definitions can be combined with custom logic, enabling synchronised multi-modal stimulation within a single script.
def Stimulate(context, x):
    context.Instruments.Stimulator.Generate("port2", context.Stimulus)
    context.Instruments.ImageDisplay.Display(context.Assets.Images.Cue, 250, True)
    return True
Stimuli can also be generated programmatically with the Stimuli Toolkit.
Trigger generation follows the same compositional principles as stimulus generation, but instead of producing continuous waveforms, it generates discrete trigger signals. These signals are typically used to synchronize instruments, mark events, or control external hardware.
Triggers are defined using
<triggers>
    <!-- composition of triggers -->
</triggers>
Triggers can be composed of the following elements:
| Stimulus | Description |
|---|---|
| trigger | Defines a trigger signal with a fixed duration. |
| combined-trigger | Combines multiple triggers by superimposing them in time. |
| repeated-trigger | Repeats a trigger or trigger composition over time. |
A <trigger> defines a signal that is active for a specified duration. Nested <code> elements describe how the trigger is routed to one or more outputs.
<trigger duration="1" Tdelay="0">
    <code output="trigger-output" />
    <code output="stimulator-trigger-output" />
    <code output="trigger-interface" value="16"/>
</trigger>
In this example, a trigger with a duration of 1 ms is generated and sent simultaneously to multiple outputs. The <code> elements specify which outputs are activated, and optional values (such as value="16") can be used to define the trigger code for a given interface.
A <combined-trigger> allows multiple triggers to be superimposed, preserving their relative timing.
<combined-triggers Tdelay="0">
    <trigger duration="10">
        <code output="trigger-output" />
    </trigger>
    <trigger duration="1" Tdelay="5">
        <code output="stimulator-trigger-output" />
        <code output="trigger-interface" value="16"/>
    </trigger>
</combined-triggers>
In this example, two triggers are combined. One trigger is active for 10 ms, while a second shorter trigger is activated after a delay of 5 ms. Both triggers are evaluated together, allowing overlapping or time-offset trigger signals to be generated as a single composition.
A <repeated-trigger> repeats a trigger or trigger composition multiple times with a fixed period.
<repeated-trigger Tperiod="10" N="3">
    <combined-trigger>
        <trigger duration="4">
            <code output="trigger-output" />
        </trigger>
        <trigger duration="1" Tdelay="1">
            <code output="stimulator-trigger-output" />
            <code output="trigger-interface" value="16"/>
        </trigger>
    </combined-trigger>
</repeated-trigger>
In this example, a combined trigger is repeated 3 times with a period of 10 ms. Each repetition preserves the internal structure and timing of the combined triggers, enabling the construction of complex, periodic trigger patterns.
The following properties are available within scripting and calculated parameters as a result of a procedure execution. They provide access to metadata, timing information, and execution state, allowing scripts and expressions to make decisions based on the outcome of a run.
| Name | Type | Description |
|---|---|---|
| ID | string | Unique identifier of the result. |
| Operator | string | Name or identifier of the operator who executed the procedure. |
| RunningTime | double | Total duration of the procedure in seconds. |
| RunningTimeInMinutes | double | Total duration of the procedure in minutes. |
| RecordingTimeString | string | Recording start time stored as a string representation. |
| ProtocolID | string | Identifier of the protocol used to generate the result. |
| MachineID | string | Identifier of the machine on which the procedure was executed. |
| OperatingSystem | string | Operating system of the machine used during execution. |
| Iteration | int | Iteration index of the procedure run. |
| Instruments | List |
List of instruments used during the procedure, including their names and identifiers. |
| Annotations | ProcedureAnnotations | Collection of annotations associated with the procedure. |
| RecordingTime | DateTime | Recording start time. |
| RecordingEndTime | DateTime | Recording end time calculated as RecordingTime + RunningTime. |
| Completed | bool | Indicates whether the procedure completed successfully. |
| Failed | bool | Indicates whether the procedure failed. |
The InstrumentDescriptor describes an instrument used during a procedure. It provides identification information, allowing results to reference which instruments were involved in the execution.
| Name | Type | Description |
|---|---|---|
| Name | string | Human-readable name of the instrument. |
| ID | string | Unique identifier of the instrument. |
DateTime represents a specific point in time, including both date and time components. It is used to store timestamps such as recording start and end times.
| Name | Type | Description |
|---|---|---|
| Year | int | The year component of the date. |
| Month | int | The month component (1–12). |
| Day | int | The day of the month. |
| Hour | int | The hour component (0–23). |
| Minute | int | The minute component (0–59). |
| Second | int | The second component (0–59). |
| Millisecond | int | The millisecond component (0–999). |
| Date | DateTime | The date component with the time set to 00:00:00. |
| TimeOfDay | TimeSpan | The time elapsed since midnight. |
| DayOfWeek | DayOfWeek | The day of the week. |
| DayOfYear | int | The day of the year (1–366). |
| Ticks | long | The number of 100-nanosecond intervals since 0001-01-01. |
TimeSpan represents a duration of time rather than a specific point in time. It is commonly used to express intervals such as elapsed time or differences between two timestamps.
| Name | Type | Description |
|---|---|---|
| Days | int | The day component of the time interval. |
| Hours | int | The hour component (0–23). |
| Minutes | int | The minute component (0–59). |
| Seconds | int | The second component (0–59). |
| Milliseconds | int | The millisecond component (0–999). |
| Ticks | long | The total number of 100-nanosecond intervals in the time interval. |
| TotalDays | double | The total duration expressed in days. |
| TotalHours | double | The total duration expressed in hours. |
| TotalMinutes | double | The total duration expressed in minutes. |
| TotalSeconds | double | The total duration expressed in seconds. |
| TotalMilliseconds | double | The total duration expressed in milliseconds. |
General purpose tests with functionality that extends across multiple application domains.
Test for determining thresholds and psychometric functions.
Procedures for performing cuff pressure algometry.